🎯 Unit 2 Activities
Table of Contents
💻 ACTIVITY PROGRAM SETUP INSTRUCTIONS
- Go to the public template repository for our class: BWL-CS HTML/CSS/JS Template
- Click the button above the list of files then select
Create a new repository - Specify the repository name:
CS1-Unit2-Activity#Replace
#with the specific activity number. - Click
Now you have your own personal copy of this starter code that you can always access under the
Your repositoriessection of GitHub! 📂 - Now on your repository, click and select the
Codespacestab - Click
Create Codespace on mainand wait for the environment to load, then you’re ready to code!
🛑 When class ends, don’t forget to SAVE YOUR WORK! Codespaces are TEMPORARY editing environments, so you need to COMMIT changes properly in order to update the main repository for your program.
There are multiple steps to saving in GitHub Codespaces:
- Navigate to the
Source Controlmenu on the LEFT sidebar - Click the button on the LEFT menu
- Type a brief commit message at the top of the file that opens, for example:
updated main.py - Click the small
✔️checkmark in the TOP RIGHT corner - Click the button on the LEFT menu
- Finally you can close your Codespace!
©️ ACTIVITY #1: Layout Copycat
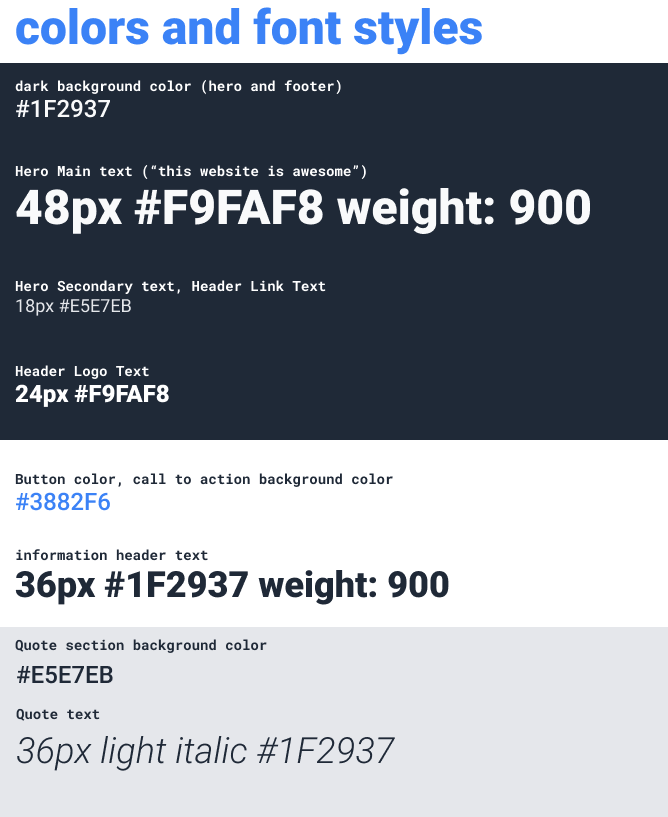
For this activity you’ll be creating a web page that mimics a provided design. The design we’re providing you comes in the form of 2 images: one is an image of the complete website, and one has some details about some of the fonts and colors we’ve used.
Get your project as close as you can to the design, but do not worry about getting it pixel-perfect. Don’t get out your ruler or count pixels to find the exact margins between the various sections. The point of this assignment is to create something from scratch and get the various elements in more or less the right position relative to the rest. It doesn’t matter if you use margin: 24px when the design actually has margin: 48px.
Instructions & Requirements
Do not be afraid to use Google or go back to the unit notes to look something up. In real life, professional developers use Google constantly for things that they have been doing for years. At this point it is not expected that you will have everything memorized, so don’t worry about it. Additionally, there are a few small details that you may not have encountered in our lessons yet. This is on purpose. These details are minor, and easily 🔍 searched (e.g. Google css rounded corners).
Iteration 1: Mimic the Structure
- Download the design images and take a look at what you’re going to be creating here: Image One (Full Design), Image Two (Color and Fonts)
Hint: The font that’s being used in the images is
Roboto, which can be found on Google Fonts. - There are many ways to tackle a project like this, and it can be overwhelming to look at a blank HTML document and not know where to start. Our suggestion: take it one section at a time.
The website you’re creating has 4 main sections (and a footer), so pick one and get it into pretty good shape before moving on. Starting at the TOP is always a solid plan.
- For the section you’re working on, begin by getting all the content onto the page before beginning to style it. In other words, code the
HTMLand then code theCSS. You’ll probably have to go back to the HTML once you start styling, but bouncing back and forth from the beginning will take more time and may cause more frustration.Many of the elements on this page are very similar to things you saw in our 📓2.1: Flexbox notes… feel free to go back to those if you need a refresher.
Iteration 2: Add Your Own Content
Finally, you are free to substitute your own content into this design. The images just have some meaningless dummy content at the moment.
Make up a fake business and personalize this page around that theme:
- Change all of the text (in
ptags,h1tags, etc) to reflect that business.Feel free to look up landing pages for real businesses for inspiration!
- Find, upload, & insert actual images in the
imgplaceholders. - In terms of CSS styling, keep the layout the same, but play around with the colors and fonts a bit.
A note about images on the web: You do not have the legal right to use just any image that you find on the web. There are many free images to be found, but make sure that the image you use is actually free for you to use, and make sure to credit the creator of the image in your project. Some good places to find free-to-use images on the web include Pexels, Pixabay, Unsplash, and CleanPNG.