📓1.2: HTML Foundations
Table of Contents
✴✴✴ NEW UNIT/SECTION! ✴✴✴
Create a blank website program to take your class notes in for the next few lessons.
Click on the collapsed heading below for GitHub instructions ⤵
📓 NOTES PROGRAM SETUP INSTRUCTIONS
- Go to the public template repository for our class: BWL-CS HTML/CSS/JS Template
- Click the button above the list of files then select
Create a new repository - Specify the repository name:
CS1-Unit1-Notes - For the description, write:
Static web pages with HTML (structure) and CSS (style) - Click
Now you have your own personal copy of this starter code that you can always access under the
Your repositoriessection of GitHub! 📂 - Now on your repository, click and select the
Codespacestab - Click
Create Codespace on mainand wait for the environment to load, then you’re ready to code! - 📝 Take notes in this Codespace during class, writing code & comments along with the instructor.
🛑 When class ends, don’t forget to SAVE YOUR WORK! Codespaces are TEMPORARY editing environments, so you need to COMMIT changes properly in order to update the main repository for your program.
There are multiple steps to saving in GitHub Codespaces:
- Navigate to the
Source Controlmenu on the LEFT sidebar - Click the button on the LEFT menu
- Type a brief commit message at the top of the file that opens, for example:
updated index.html - Click the small
✔️checkmark in the TOP RIGHT corner - Click the button on the LEFT menu
- Finally you can close your Codespace!
Introduction to HTML
HTML (HyperText Markup Language) defines the structure and content of webpages. We use HTML elements to create all of the paragraphs, headings, lists, images, and links that make up a typical webpage.
HTML and CSS are two languages that work together to create everything that you see when you look at something on the internet. HTML is the raw data and content that a webpage is built out of. All the text, links, cards, lists, and buttons are created in HTML. CSS is what adds style to those plain elements. HTML puts information on a webpage, and CSS positions that information, gives it color, changes the font, and makes it look great!
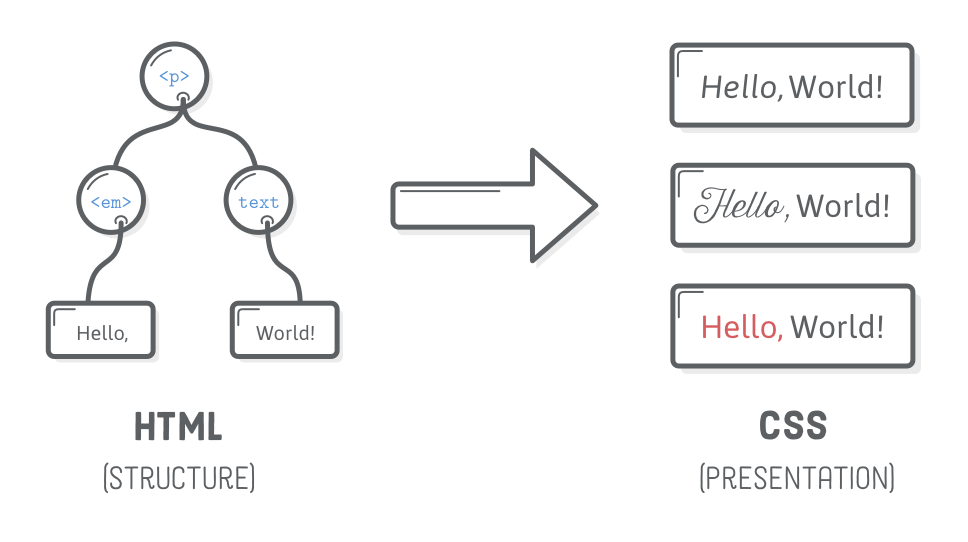
Many great resources out there keep referring to HTML and CSS as programming languages, but if you want to get technical, labeling them as such is not quite accurate, because they are only concerned with presenting information. They are not used to program any logic. JavaScript, which you will be learning in the next section, is a programming language because it’s used to make webpages do things.
- Read HTML vs CSS vs JavaScript to get a quick overview of the relationship between HTML, CSS, and JavaScript. Discuss with the class.
- Save DevDocs.io as a bookmark for future reference. It’s a massive API documentation collection maintained by FreeCodeCamp. Read the ‘Welcome’ message for more information.
Elements and Tags
Almost all elements on an HTML page are just pieces of content wrapped in opening and closing HTML tags.
Opening tags tell the browser that this is the start of an HTML element. They are comprised of a keyword enclosed in angle brackets <>. For example, an opening paragraph tag looks like this: <p>.
Closing tags tell the browser where an element ends. They are almost the same as opening tags; the only difference is that they have a forward slash before the keyword. For example, a closing paragraph tag looks like this: </p>.
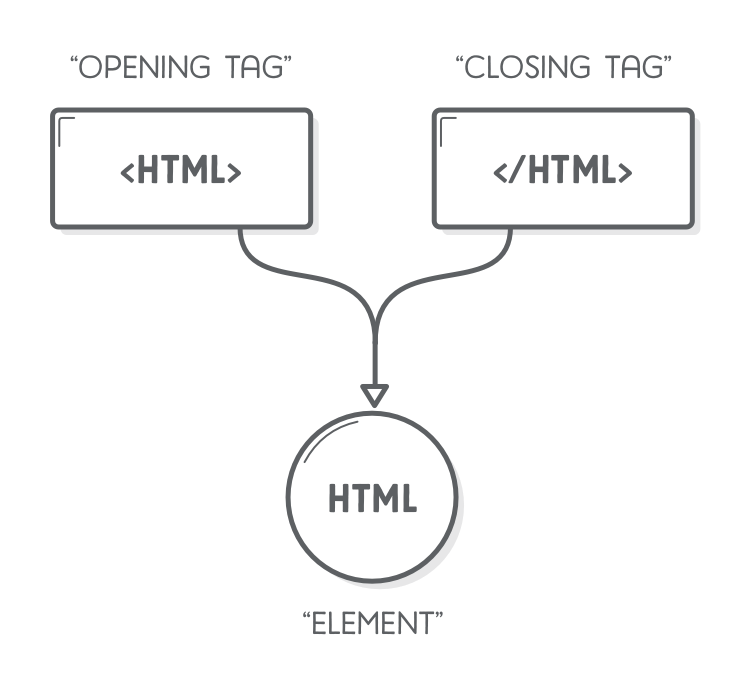
A full paragraph element looks like this:
<p>some text content</p>
Let’s break this down:
<p>is the opening tag.some text contentrepresents content wrapped within the opening and closing tags.</p>is the closing tag.
You can think of elements as containers for content. The opening and closing tags tell the browser what content the element contains. The browser can then use that information to determine how it should interpret and format the content.
HTML has a vast list of predefined tags that you can use to create all kinds of different elements. It is important to use the correct tags for content. Using the correct tags can have a big impact on two aspects of your sites: how they are ranked in search engines; and how accessible they are to users who rely on assistive technologies, like screen readers, to use the internet.
Void Elements
Some HTML elements do not have a closing tag. These elements just have a single tag, like: <br>, <hr>, or <img>. They are known as void elements because they are void of any text content, there is nothing inside of them. No closing tag means they can’t wrap text content like other tags do. You might also see these referred to as self-closing tags.
HTML Boilerplate
All HTML documents have the same basic structure or boilerplate that needs to be in place before anything useful can be done. In this lesson, we will explore the different parts of this boilerplate and see how it all fits together.
Within your project you’ll find a file named index.html.
You’re probably already familiar with a lot of different types of files, for example doc, pdf, and image files. To let the computer know we want to create an HTML file, we need to append the filename with the .html extension, as we have done when creating the index.html file.
It is worth noting that we named our HTML file index. We should always name the HTML file that will contain the homepage of our website index.html. This is because web servers will by default look for an index.html page when users land on our websites – and not having one will cause big problems.
The DOCTYPE Declaration
Every HTML page starts with a doctype declaration. The doctype’s purpose is to tell the browser what version of HTML it should use to render the document. The latest version of HTML is HTML5, and the doctype for that version is <!DOCTYPE html>.
HTML Element
After we declare the doctype, we need to provide an <html> element. This is what’s known as the root element of the document, meaning that every other element in the document will be a descendant of it.
This becomes more important later on when we learn about manipulating HTML with JavaScript. For now, just know that the <html> element should be included on every HTML document.
Back in the index.html file, let’s add the <html> element by typing out its opening and closing tags, like so:
<!DOCTYPE html>
<html lang="en">
</html>
Noticed the word lang here? It represents an HTML attribute which is associated with the given HTML tag i.e. <html> in this case. These attributes provide additional information about HTML elements. (More about HTML Attributes in the following section.)
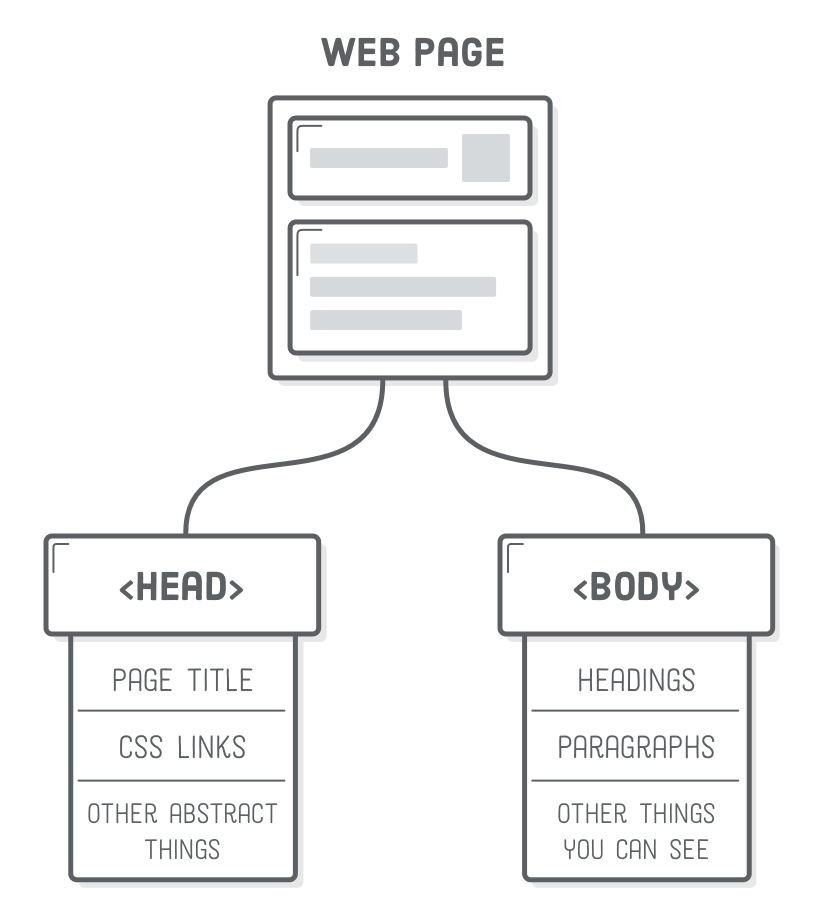
Head Element
The <head> element is where we put important meta-information about our webpages, and stuff required for our webpages to render correctly in the browser. Inside the <head>, we should not use any element that displays content on the webpage.
Back in our index.html file, let’s add a <head> element with a <meta> element and a title within it. The <head> element goes within the <html> element and should always be the first element under the opening <html> tag:
<!DOCTYPE html>

<html lang="en">
  <head>
    <meta charset="UTF-8">
    <title>My First Webpage</title>
  </head>
</html>
Meta Element
We should always have the <meta> tag with the charset encoding of the webpage in the <head> element: <meta charset="utf-8">.
Setting the encoding is very important because it ensures that the webpage will display special symbols and characters from different languages correctly in the browser.
Title Element
Another element we should always include in the head of an HTML document is the <title> element:
<title>My First Webpage</title>
The <title> element is used to give webpages a human-readable title, which is displayed in our webpage’s browser tab. For example, if you look at the current tab’s name of your browser, it will read “HTML Boilerplate | The Odin Project”; this is the <title> of the current .html file.
If we didn’t include a <title> element, the webpage’s title would default to its file name. In our case that would be index.html, which isn’t very meaningful for users; this would make it very difficult to find our webpage if the user has many browser tabs open.
There are many more elements that can go within the head of an HTML document. However, for now it’s only crucial to know about the two elements we have covered here. We will introduce more elements that go into the head throughout the rest of the curriculum.
Body Element
The final element needed to complete the HTML boilerplate is the <body> element. This is where all the content that will be displayed to users will go - the text, images, lists, links, and so on.
To complete the boilerplate, add a <body> element to the index.html file. The <body> element also goes within the <html> element and is always below the <head> element, like so:
<!DOCTYPE html>
<html lang="en">
  <head>
    <meta charset="UTF-8">
    <title>My First Webpage</title>
  </head>

  <body>
  </body>
</html>
Build some muscle memory by deleting the contents of the index.html file and trying to write out all the boilerplate again from memory. Don’t worry if you have to peek at the lesson content the first few times if you get stuck. Just keep going until you can do it a couple of times from memory.
Working with Text
Most content on the web is text-based, so you will find yourself needing to work with HTML text elements quite a bit.
In this module, we will learn about the text-based elements, including:
- How to create paragraphs.
- How to create headings.
- How to create bold text.
- How to create italicized text.
- The relationships between nested elements.
- How to create HTML comments.
Open your notes repository
- Go to GitHub and click on your picture in the TOP RIGHT corner
- Select
Your repositories - Open
CS1-Unit1-Notes - Now on your repository, click and select the
Codespacestab - Click
Create Codespace on main(unless you already have one listed there), wait for the environment to load, then you’re ready to code! - 📝 Take notes in this Codespace during class, coding along with the instructor.
Paragraph Element
What would you expect the following text to output on an HTML page?
<body>
  Lorem ipsum dolor sit amet, consectetur adipiscing elit, sed do eiusmod tempor
  incididunt ut labore et dolore magna aliqua.

  Ut enim ad minim veniam, quis nostrud exercitation ullamco laboris
  nisi ut aliquip ex ea commodo consequat.
</body>
It looks like two paragraphs of text, so you might expect it to display in that way. However, that is not the case, as you can see in the output below:
See the Pen no-paragraphs-example by TheOdinProject (@TheOdinProjectExamples) on CodePen.
When the browser encounters new lines like this in your HTML, it will compress them down into one single space. The result of this compression is that all of the text is clumped together into one long line.
If we want to create paragraphs in HTML, we need to use the paragraph element, which will add a new line after each of our paragraphs. A paragraph element is defined by wrapping text content with a <p> tag.
Changing our example from before to use paragraph elements fixes the issue:
See the Pen pargraph-example by TheOdinProject (@TheOdinProjectExamples) on CodePen.
Heading Elements
Headings are different from other HTML text elements: they are displayed larger and bolder than other text to signify that they are headings.
There are 6 different levels of headings starting from <h1> to <h6>. The number within a heading tag represents that heading’s level. The largest and most important heading is h1, while h6 is the tiniest heading at the lowest level.
Headings are defined much like paragraphs. For example, to create an h1 heading, we wrap our heading text in an <h1> tag:
See the Pen HTML-headings-example by TheOdinProject (@TheOdinProjectExamples) on CodePen.
Using the correct level of heading is important as levels provide a hierarchy to the content. An h1 heading should always be used for the heading of the overall page, and the lower level headings should be used as the headings for content in smaller sections of the page.
Strong (Bold) Element
The <strong> element makes text bold. It also semantically marks text as important; this affects tools, like screen readers, that users with visual impairments will rely on to use your website. The tone of voice on some screen readers will change to communicate the importance of the text within a strong element. To define a strong element, we wrap text content in a <strong> tag.
You can use strong on its own, but you will probably find yourself using the strong element much more in combination with other text elements, like this:
See the Pen HTML-strong-with-paragraph-exmample by TheOdinProject (@TheOdinProjectExamples) on CodePen.
Sometimes you will want to make text bold without giving it an important meaning. You’ll learn how to do that in the CSS lessons later in the curriculum.
Emphasised (Italic) Element
The <em> element makes text italic. It also semantically places emphasis on the text, which again may affect things like screen readers. To define an emphasised element, wrap the text content in an <em> tag.
Again, like the strong element, you will find yourself mostly using the <em> element with other text elements:
See the Pen HTML-em-with-paragraph-example by TheOdinProject (@TheOdinProjectExamples) on CodePen.
Nesting and Indentation
You may have noticed that in all the examples in this lesson we indent any elements that are within other elements. This is known as nesting elements.
When we nest elements within other elements, we create a parent and child relationship between them. The nested elements are the children and the element they are nested within is the parent.</span>
In the following example, which element is the parent and which element is the child?
See the Pen HTML-nesting-parent-child by TheOdinProject (@TheOdinProjectExamples) on CodePen.
Just as in human relationships, HTML parent elements can have many children. Elements at the same level of nesting are considered to be siblings.
We use indentation to make the level of nesting clear and readable for ourselves and other developers who will work with our HTML in the future. In our examples, we have indented any child elements by two spaces per nesting level.
The parent, child, and sibling relationships between elements will become much more important later when we start styling our HTML with CSS and adding behavior with JavaScript. For now, however, it is just important to know the distinction between how elements are related and the terminology used to describe their relationships.
HTML Comments
HTML comments are not visible to the browser; they allow us to comment on our code so that other developers or our future selves can read them and get some context about something that might not be clear in the code.
In order to write an HTML comment, we just enclose the comment with <!-- and --> tags. For example:
See the Pen HTML-comments-example by TheOdinProject (@TheOdinProjectExamples) on CodePen.
To get some practice working with text in HTML, create a plain blog article page which uses different headings, uses paragraphs, and has some text in the paragraphs bolded and italicized.
Additional Resources
- The semantic difference between <strong> and <b> or <em> and <i> tags and when to use them.
- An interactive HTML text formatting article
Links and Images
Links are one of the key features of HTML. They allow us to link to other HTML pages on the web. In fact, this is why it was named the “web” 🕸️.
In this lesson, we will learn:
- How to create links to pages on other websites on the internet.
- How to create links to other pages on your own websites.
- The difference between absolute and relative links.
- How to display an image on a webpage using HTML.
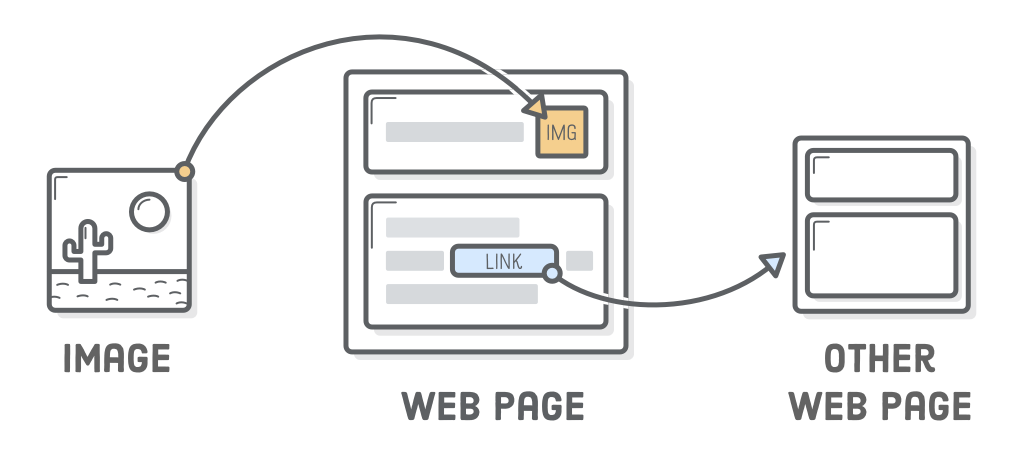
Anchor (Link) Element
⚓️ To create a link in HTML, we use the anchor element. An anchor element is defined by wrapping the text or another HTML element we want to be a link with an <a> tag.
Add the following to the body of the index.html page:
<a>About The Odin Project</a>
You may have noticed that clicking this link doesn’t do anything. This is because an anchor tag on its own won’t know where we want to link to. We have to tell it a destination to go to. We do this by using an HTML attribute.
An HTML attribute gives additional information to an HTML element and always goes in the element’s opening tag. An attribute is usually made up of two parts: a name, and a value; however, not all attributes require a value. In our case, we need to add an href (hypertext reference) attribute to the opening anchor tag. The value of the href attribute is the destination (URL) we want our link to go to. 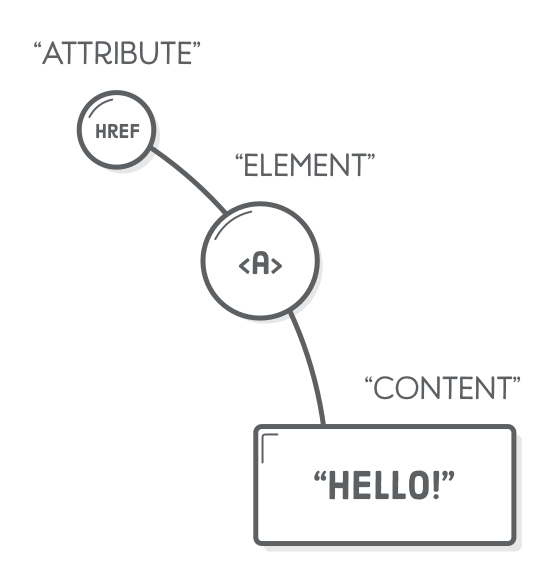
Add the following href attribute to the anchor element we created previously and try clicking it again, don’t forget to refresh the browser so the new changes can be applied.
<a href="https://www.theodinproject.com/about">About The Odin Project</a>
By default, any text wrapped with an anchor tag without an href attribute will look like plain text. If the href attribute is present, the browser will give the text a blue color and underline it to signify it is a link.
It’s worth noting you can use anchor tags to link to any kind of resource on the internet, not just other HTML documents. You can link to videos, pdf files, images, and so on, but for the most part, you will be linking to other HTML documents.
Absolute vs. Relative Links
Generally, there are two kinds of links we will create:
- Absolute Links: Links to pages on other websites on the internet.
- A typical absolute link will be made up of the following parts:
protocol://domain/path. An absolute link will always contain the protocol and domain of the destination, for example:https://www.theodinproject.com/about
- A typical absolute link will be made up of the following parts:
- Relative Links: Links to pages located on our own websites.
- Relative links do not include the domain name, since it is another page on the same site, it assumes the domain name will be the same as the page we created the link on.

Image Elements
Websites would be fairly boring if they could only display text. Luckily HTML provides a wide variety of elements for displaying all sorts of different media. The most widely used of these is the image element.
To display an image in HTML we use the <img> element. Unlike the other elements we have encountered, the <img> element is a void element. As we have seen earlier in the course, void elements do not need a closing tag because they are naturally empty and do not contain any content.
Instead of wrapping content with an opening and closing tag, it embeds an image into the page using a src attribute which tells the browser where the image file is located. The src attribute works much like the href attribute for anchor tags. It can embed an image using both absolute and relative paths.
For example, using an absolute path we can display an image located on The Odin Project site:
See the Pen absolute-path-image by TheOdinProject (@TheOdinProjectExamples) on CodePen.
To display images on your website that are hosted on your own web server, you can use a relative path.
You will encounter many image formats, but here are the more common ones:

-
Download this stock dog image or pick something els.
-
Right click on the new download at the bottom of the Google Chrome window and select “Show in folder”.
-
Click
+in theFile Explorerpane of your project to upload the image, or try just dragging it in. -
Finally add the image address to the
index.htmlfile:
<body>
  <h1>Homepage</h1>
  <img src="./images/dog.jpg">
</body>
Alt Attribute
Besides the src attribute, every image element must also have an alt (alternative text) attribute.
The alt attribute is used to describe an image. It will be used in place of the image if it cannot be loaded. It is also used with screen readers to describe what the image is to visually impaired users.
As a bit of practice, add an alt attribute to the dog image in the project.
Image Size Attributes
While not strictly required, specifying height and width attributes in image tags helps the browser layout the page without causing the page to jump and flash.
It is a good habit to always specify these attributes on every image, even when the image is the correct size or you are using CSS to modify it.
Go ahead and update your project with width and height tags on the dog image.
Additional resources
- Interneting is hard’s treatment on HTML links and images
- What happened the day Google decided links including (
/) were malware - Chris Coyier’s When to use target=”_blank” on CSS-Tricks
- Read about the four main image formats that can be used on the web.
- If you’re looking to deepen your understanding of the various image formats used on the web, the following article which is titled: Which is the Best Image Format for Your Website? from imagekit.io is a great resource. It offers a detailed comparison of JPEG, PNG, GIF, and WebP formats, helping you choose the right one for your needs. Note that the article doesn’t cover SVG, but it’s still an excellent guide for the other common formats.
Lists
Whether it be IMDB’s top 250 movies or the FBI’s most wanted, lists are everywhere on the web and you are going to need one eventually in your webpages.
Luckily, with HTML there are a couple of different types of lists at your disposal: unordered or ordered.
Unordered Lists
If you want to have a list of items where the order doesn’t matter, like a shopping list of items that can be bought in any order, then you can use an unordered list.
Unordered lists are created using the <ul> element, and each item within the list is created using the list item element <li>.
Each list item in an unordered list begins with a bullet point:
See the Pen html-unordred-list by TheOdinProject (@TheOdinProjectExamples) on CodePen.
Ordered Lists
If you instead want to create a list of items where the order does matter, like step-by-step instructions for a recipe, or your top 10 favorite TV shows, then you can use an ordered list.
Ordered lists are created using the <ol> element. Each individual item in them is again created using the list item element <li>. However, each list item in an ordered list begins with a number instead:
See the Pen html-ordered-list by TheOdinProject (@TheOdinProjectExamples) on CodePen.
To get some practice using lists, create the following lists in your HTML document:
- An unordered shopping list of your favorite foods
- An ordered list of todo’s you need to get done today
- An unordered list of places you’d like to visit someday
- An ordered list of your all time top 5 favorite video games or movies
Additional resources
- MDN documentation on the unordered list element
- MDN documentation on the ordered list element
- Shay Howe’s HTML lists tutorial
Acknowledgement
Content on this page is adapted from The Odin Project and most images are from Interneting is Hard.